
Assembling a PC for the first time can be challenging, and many beginners are confused about where they should connect the SATA cables.
There are two types of SATA cables, a SATA data cable and a SATA power cable. Both these cables are used for different purposes.
SATA data cable is used to transfer data, and SATA power cable is used to supply power.
The SATA power cable should not be plugged into the motherboard; instead, you have to plug this cable into the drive’s 15-pin power slot.
On the other hand, you have to connect one end of the SATA data cable to the motherboard’s SATA port, and the other end goes to the drive’s 7-pin slot.
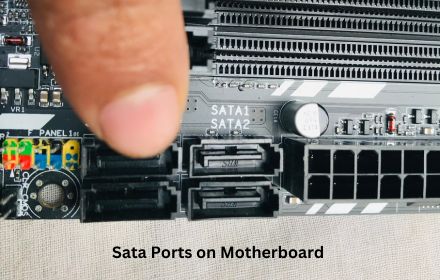
Usually, a motherboard comes with 4 to 8 SATA ports, depending on its specifications. These SATA ports on the motherboard can be recognized by their L-shaped design.
The SATA data cable also has an L-shaped design; read this article to check both ends of SATA cables.
It is confusing to determine in which slot you should connect the SATA cable because of the different SATA revisions and speed differences.
You have to read this article till the end to clear all your doubts about these queries.
Understand different SATA Revisions
The motherboard’s SATA slots have different revisions, which are typically abbreviated as SATA 1.0, SATA 2.0, and SATA 3.0.
These different SATA revisions have different speed differences. Check this table to understand the speed differences-
| SATA Revisions | Speed in MB/s | Speed in GBit/s |
| SATA 1.0 | 150 Megabyte/s | 1.5 Gigabit/s |
| SATA 2.0 | 300 MB/s | 3.0 Gbit/s |
| SATA 3.0 | 600 MB/s | 6.0 Gbit/s |
Although these SATA revisions are backward and forward-compatible, you will get different speeds.
Identify Your Motherboard’s Available SATA Ports
Which SATA port you should use depends on what SATA port revision your motherboard has.
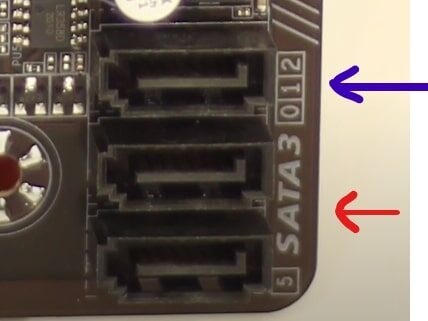
The latest motherboards come with clear labeling for SATA port revisions and numbering.
As a demonstration, my motherboard clearly indicates both the SATA revisions (SATA 3.0) and port numbering (SATA 0, SATA 1, and SATA 2).
Here, the SATA revisions are demonstrated by the red arrow, and the SATA port numbering is demonstrated by the blue arrow.
Sadly, not all motherboards show SATA revisions and port numbering, and for those motherboards, the only way to find out the SATA revisions is by checking the motherboard specification.
However, identifying the SATA port revisions via specifications or manual page can sometimes be misleading.
Because on some motherboards, the SATA interface speed is mentioned instead of the SATA revision.
Let’s understand this by taking the example of the ASUS H61 M-K motherboard-
The specifications sheet of this motherboard demonstrates that this motherboard has SATA 3.0 GB/s SATA port.
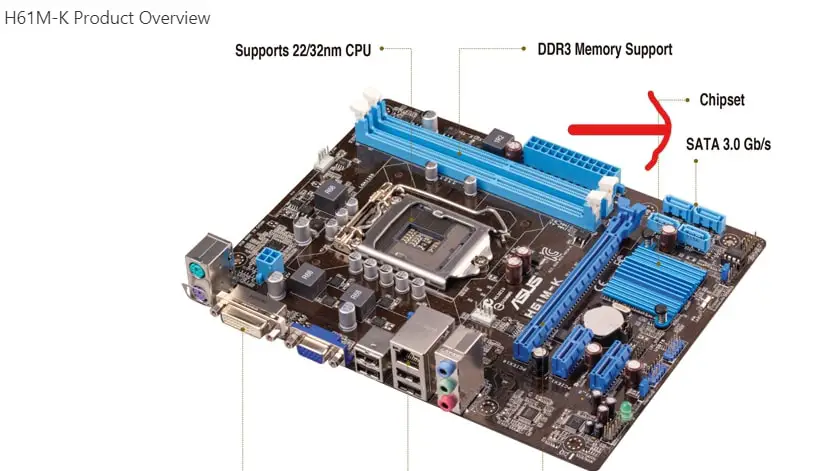
Here, the 3.0 label does not mean that it is a SATA 3 revision port; rather, it indicates that it can transfer data at a speed of 3 Gigabit/s, which means it is a SATA 2.0 revision.
This is how by checking the motherboard’s manual page of specifications, you can identify whether your motherboard has SATA 2.0 revision or SATA 3.0 revision ports.
On Which SATA Port Should You Plug The SATA Cable
After checking the SATA port revision of your motherboard, you have to make a decision about which device you want to install (SATA SSD or Hard Drive), and then you can choose the appropriate SATA port to connect the SATA cable.
Let’s dive deeper into this-
Install SATA SSDs on SATA 3.0 Port
If you purchase a brand new motherboard, then most probably, the motherboard will have all the SATA 3.0 revision ports.
On these motherboards, you can install SATA SSDs on any particular SATA slot without having any issues.
But, if you are installing SATA SSD on old motherboards, check which SATA slot works on SATA revision 3.0 and then install the SSD.
However, if the motherboard does not have any SATA 3.0 revision port, then you can plug the SSD into SATA 2.0 revision port, but you won’t get that much performance.
Let’s understand this- if you install a SATA 3.0 SSD whose speed is (500-600 megabyte/s) on the motherboard’s SATA 2.0 slot, then the data will be transferred at the speed of 300 megabyte/s (not 600 megabyte/s).
If your motherboard is too old and doesn’t have the SATA 2.0 port, then please don’t install the SSD on the SATA 1.0 port.
In this case, instead of using the SATA SSD in SATA 1.0 revision port, you can buy a new hard drive with a 7200 RPM, which will give you higher performance.
Read this article to know what SATA cable you should use for your SSDs.
You Can Install an HDD on SATA 2.0
If your motherboard doesn’t have the SATA 3.0 port, then you can install any Hard drive on SATA 2.0 port.
If you install a hard drive on SATA 2.0 port, then it will not affect the speed of data transfer because the speed of a 7200RPM hard drive is 200 megabit/s, and the SATA 2.0 can transfer the data at the speed of 300 megabyte/s.
What To Do If Motherboard Only Has SATA 1.0 Slot
If you install a SATA SSD or hard drive on the motherboard’s SATA 1.0 slot, then you will not get that much speed performance.
To achieve higher performance, the only solution is to add new SATA 2.0 or SATA 3.0 revision ports on the motherboard.
You can buy any PCIe to SATA adapter, and by using this adapter, you can add SATA ports with 2.0 or 3.0 revisions.
How To Plug SATA Cable On Motherboard?
After identifying the revisions SATA port, you can easily connect the SATA data cable to the motherboard’s SATA port.
The SATA cable and the SATA port on the motherboard have L- shaped; by matching the L-shaped properly, you can easily connect the SATA cable to the motherboard.
Wrapping Up
This entire article tells you that you need to plug the SATA data cable into the motherboard’s SATA port.
But remember, not all SATA ports are the same; the SATA port has different revisions, including- SATA 1.0, SATA 2.0, and SATA 3.0.
SATA 3.0 can provide a higher speed than SATA 2.0, and SATA 2.0 supports a higher speed than SATA 1.0.
Therefore, you should always plug your SSD or Hard Drive into SATA 3.0 or SATA 2.0 port.
If your motherboard doesn’t have any of these ports, then you can add these SATA ports by purchasing a PCIe to SATA adapter.
I hope this article may be helpful to you, and if you have any queries, then ask me in the comment box.